This article is getting pretty old. There have been several OpenBSD releases since I wrote it.
I recently had an opportunity to buy an old 1U Dell server for a good price. I thought it would be a neat project to set up OpenBSD on it and get it racked up at a local ISP.
The server was loaded up with a pair of 6-way Xeon processors, 64GB of memory, and six 600GB 10kRPM disks. I took a peek at the OpenBSD manual pages and found that it has drivers that should work fine with the network and storage adapters in the R610.
The server came with a pair of redundant power supplies. My ISP only offers a single outlet in their most modestly priced collocation package, so I picked up an IEC Y-cable. This isn't as good as having each power supply connected to a separate power feed, but I guess it's more likely something in one of the ten-year-old power supplies is going to give up than it is that the rack I'm in will lose power.
Speaking of racks... I had to pick up a pair of rails since the server didn't come with them. Dell made both static and sliding rails for this model. I preferred the static rails since they accommodate a wider range of rack configurations and I didn't anticipate much need for working on the server while it was plugged in. The static rails seem to be less common on the used market, but I was eventually able to source a pair for a good price.
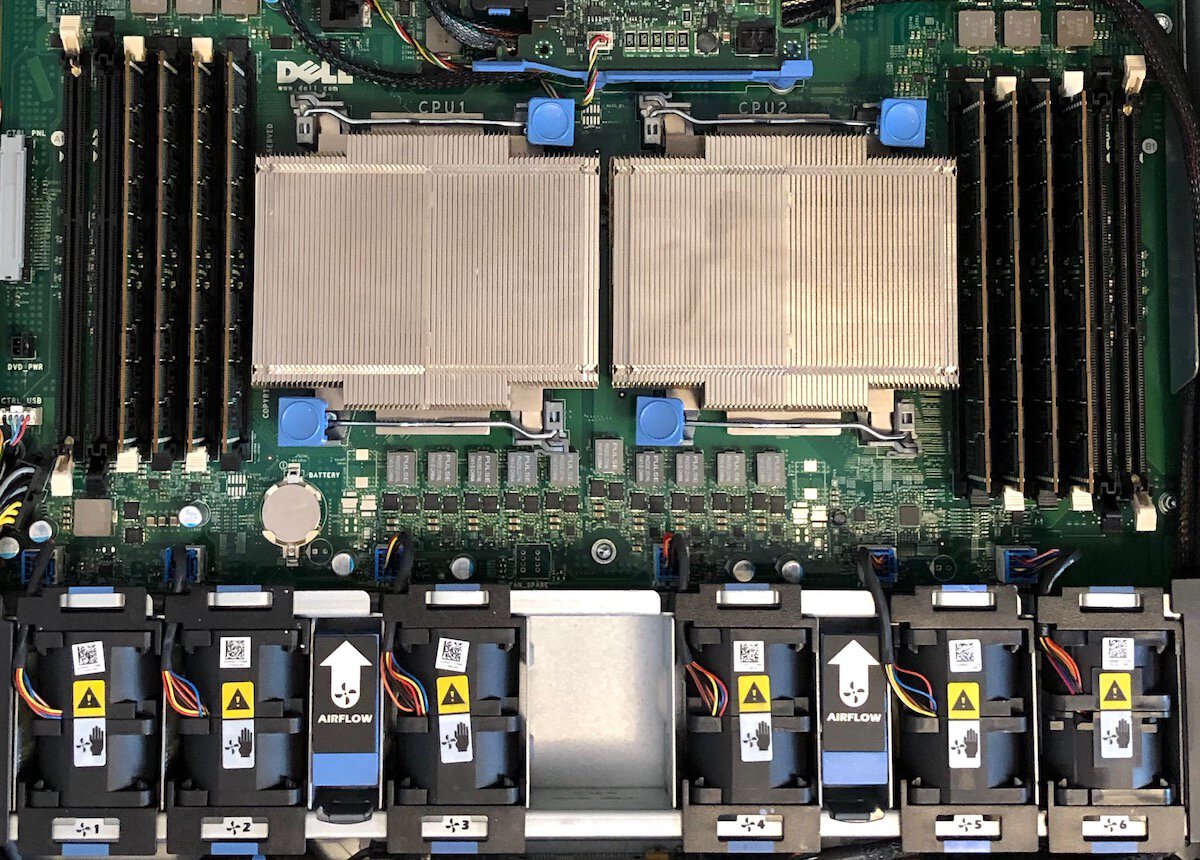
The R610 supports Advanced ECC, but it requires that the memory be connected in a particular layout and it reduces the maximum number of DIMMs that can be installed from twelve to eight. Happily, the 64GB of memory that came with the server was already layed out as eight 8GB DIMMS, I just had re-arrange what slots they were in.
Since the system was already nearly ten years old, I took the opportunity while I had it open to replace the primary lithium cell on the motherboard. The storage controller also has a rechargeable lithium pack for its write-back cache, but its health was reported as good and visual inspection didn't indicate any issues. I left it for now.
The server came with the enterprise add-on card for the iDRAC. I didn't plan to use the features it provided and — frankly — the DRAC felt a little buggy when I was setting it up and removing this card seemed to help so I left it out.
I didn't need enormous storage on this server so I tried pulling out all of the spinning disks and installing a single modern SSD instead (the storage controller supports SATA as well as SAS), but I wasn't able to get any better performance out of it than I could out of a single spinning disk. I found some folks online asking about this, but didn't find any answers that worked for me. I put the spinning disks back in and figured I'd try to make the best of them.
After replacing the motherboard battery, I had to set the time and date in the system setup menu (F2 during boot). While I was in there, I also confirmed that Advanced ECC was enabled and I set up serial console redirection (115,200 baud, VT220 terminal, redirection disabled after POST). I didn't plan on booting over the network, so I disabled the NIC in the boot order menu. I disabled the memory test as well, along with the built-in SATA controller (no optical drive and I'd be using the RAID controller for the disks).
Next, I popped into the storage controller's setup menu (ctrl-R during boot). The controller came with a pair of disks configured in RAID-1 and the other four configured in RAID-5. I cleared the controller configuration and created a new virtual disk with RAID-10 across the first four disks. I selected a 64k stripe size, enabled adaptive read-ahead, and enabled write-back (I'm not really sure about what the workload will be, but this seemed like an alright place to start). I added the remaining two disks as hot spares and initialized the virtual disk.
My next visit was to the DRAC's configuration menu (ctrl-E at boot). I didn't have the password for the DRAC, so I performed a full reset to defaults from the configuration menu and powered the system back down. I used the server's front panel to set the DRAC IP address. Pretty soon it came up on my network. With the enterprise card removed, I found it was listening on TCP ports 22 (SSH), 80 (presumably just to redirect to 443), and 443 (HTTPS) as well as UDP 623 (remote RACADM, I guess). I ssh'd in using the default user name and password so I could disable the web server and remote RACADM, change the default user name and password, change the SSH port, and reset the DRAC.
racadm config -g cfgractuning -o cfgractunewebserverenable 0
racadm config -g cfgractuning -o cfgractuneremoteracadmenable 0
racadm config -g cfguseradmin -i 2 -o cfguseradminusername [user name]
racadm config -g cfguseradmin -i 2 -o cfguseradminpassword [password]
racadm config -g cfgractuning -o cfgractunesshport [port]
racadm racreset
The online help and DRAC user's guide were very helpful in performing these tasks. I made a note of some other useful commands while I was in there.
console com2 — open session on serial port, ^\ to close
racadm serveraction powerup — power on the system
racadm serveraction powerdown — power off the system
racadm closessn -a — close all sessions other than the current one
I used dd to put install66.fs on a little USB key. Before putting it in the
server, I mounted the key and added stty com1 115200 and
set tty com1 to the beginning of etc/boot.conf
and boot -c to the end of it. The idea was to configure the
serial port and set it up as the console, then start the kernel in boot_config
mode so I could disable the network drivers. I wanted to perform the install
over the network using the DRAC as a serial console. The DRAC shares the network
adapter with the host system, but OpenBSD does not share so I'd need it to
stay out of the way during installation. With the USB key set up, I connected
it to the server's internal USB port.
With the server ready to go, I ssh'd to the DRAC again and ran racadm
serveraction powerup to start the system and console com2
to connect to the serial console and watch the boot process. I used the boot
manager (F11 at boot, esc-! through the DRAC) to select the internal USB port
as the boot source. The boot manager left the console in a weird state, so I
exited with ctrl-\ and re-entered with console com2. Hitting
enter got me a UKC prompt. I entered disable bnx to disable the
network adapter drivers and then exit to allow startup to proceed.
I did a pretty normal OpenBSD install, as shown below.
Welcome to the OpenBSD/amd64 6.6 installation program.
(I)nstall, (U)pgrade, (A)utoinstall or (S)hell? i
At any prompt except password prompts you can escape to a shell by
typing '!'. Default answers are shown in []'s and are selected by
pressing RETURN.  You can exit this program at any time by pressing
Control-C, but this can leave your system in an inconsistent state.

Terminal type? [vt220]
System hostname? (short form, e.g. 'foo') lucy

Available network interfaces are: vlan0.
Which network interface do you wish to configure? (or 'done') [vlan0] done
DNS domain name? (e.g. 'example.com') [my.domain] parksdigital.com
DNS nameservers? (IP address list or 'none') [none] 207.179.70.27 207.179.71.27

Password for root account? (will not echo)
Password for root account? (again)
Start sshd(8) by default? [yes]
Do you want the X Window System to be started by xenodm(1)? [no]
Change the default console to com1? [yes] no
Setup a user? (enter a lower-case loginname, or 'no') [no] user
Full name for user user? [user] User
Password for user user? (will not echo)
Password for user user? (again)
WARNING: root is targeted by password guessing attacks, pubkeys are safer.
Allow root ssh login? (yes, no, prohibit-password) [no]
What timezone are you in? ('?' for list) [America/New_York] America/Detroit

Available disks are: sd0 sd1.
Which disk is the root disk? ('?' for details) [sd0] ?
sd0: DELL, PERC 6/i, 1.22 naa.6d4ae5206bf7be0025f69afe0bcc2429 (1117.6G)
sd1: SanDisk', Cruzer Fit, 1.00 serial.07815571230908114424 (14.9G)
Available disks are: sd0 sd1.
Which disk is the root disk? ('?' for details) [sd0]
No valid MBR or GPT.
Use (W)hole disk MBR, whole disk (G)PT or (E)dit? [whole]
Setting OpenBSD MBR partition to whole sd0...done.
Use (A)uto layout, (E)dit auto layout, or create (C)ustom layout? [a]
Available disks are: sd1.
Which disk do you wish to initialize? (or 'done') [done]

Let's install the sets!
Location of sets? (disk http nfs or 'done') [disk] disk
Is the disk partition already mounted? [yes] no
Available disks are: sd0 sd1.
Which disk contains the install media? (or 'done') [sd1]
  a:           920512             1024  4.2BSD   2048 16384 16142
  i:              960               64   MSDOS
Available sd1 partitions are: a i.
Which sd1 partition has the install sets? (or 'done') [a]
Pathname to the sets? (or 'done') [6.6/amd64]

Select sets by entering a set name, a file name pattern or 'all'. De-select
sets by prepending a '-', e.g.: '-game*'. Selected sets are labelled '[X]'.
    [X] bsd           [X] base66.tgz    [X] game66.tgz    [X] xfont66.tgz
    [X] bsd.mp        [X] comp66.tgz    [X] xbase66.tgz   [X] xserv66.tgz
    [X] bsd.rd        [X] man66.tgz     [X] xshare66.tgz
Directory does not contain SHA256.sig. Continue without verification? [no] yes

Location of sets? (disk http nfs or 'done') [done]
Saving configuration files... done.
Making all device nodes... done.
Multiprocessor machine; using bsd.mp instead of bsd.
Relinking to create unique kernel... done.

CONGRATULATIONS! Your OpenBSD install has been successfully completed!

When you login to your new system the first time, please read your mail
using the 'mail' command.

Exit to (S)hell, (H)alt or (R)eboot? [reboot] s
After the install, I dropped out to a shell and configured the network. I had to do this manually since I hadn't let the install script know about my network adapter.
echo inet 69.63.227.51 255.255.255.248 > mnt/etc/hostname.bnx0
echo 69.63.227.49 > mnt/etc/mygate
reboot
I waited for the server to reboot. Sure enough, it came up on the network and I was able to ssh in.
I wanted to configure the empty space on the USB stick so I could use it. I
ran fdisk -e sd1 and edited partition three to maximize its size.
After saving, I exited and ran dislabel -E sd1 and set the OpenBSD
boundary to encompass the newly available space, then added a new partition
b (4.2BSD type) to use the space. After saving again here, I exited
and ran newfs sd1b to initialize the filesystem. I did mkdir
/usb to make a place to mount the new filesystem and then added
[DUID].b /usb ffs rw,nodev,nosuid 0 2 to /etc/fstab (I got the
DUID earlier from disklabel). Finally, I ran mount /usb to mount
the partition.
I tested using the internal USB key for recovery. With the system powered
down, I ssh'd to the DRAC and ran racadm serveraction powerup to
start the system, then console com2 to connect to the serial
console. I used the boot manager (F11 at boot, esc-! through the DRAC) to select
internal USB as the boot source. The boot manager again left the console in a
weird state, so I used ctrl-\ to exit and console com2 to
reconnect. I hit enter to get the UKC prompt and entered disable
bnx followed by exit to disable the network adapter driver
and let startup proceed. At the install prompt, I selected s for
shell. I found that the device nodes for the storage adapter were not yet
created, so I did cd dev and sh MAKEDEV sd0 sd1 to
make device nodes for the storage adapter and USB key. I was then able to do
mount /dev/sd0a /mnt to mount the server's root partition. This
should be sufficient for recovery if it becomes necessary.
I updated /etc/ssh/sshd_config to allow only public key
authentication by uncommenting the PasswordAuthentication no line
(root logins were disabled during installation). Then I restarted sshd.
host# kill -HUP `cat /var/run/sshd.pid`
Then I confirmed that I wasn't able to log in as root or use password authentication in my ssh client.
I took a look at the mail that was waiting for root. It included the install script output and some advice on getting started with OpenBSD. I checked through the suggested items along with the stuff in the afterboot manual page and was happy with what I found.
I noticed that I was getting a daily email from the system. By default,
daily runs every day to
do some valuable system checks. It also provides some informational output which
can be disabled so that root will only receive mail from the script
when something is wrong, rather than every day. The informational output is
disabled by creating /etc/daily.local and setting the appropriate
variable.
VERBOSESTATUS=0
Since I don't plan to visit the datacenter this server is going to with any regularity, I figured it would be good to be able to monitor the health of the disk subsystem remotely. I'm familiar with sensorsd, but I figured for now I'd be happy to just see some vital statistics when I log in from time to time.
Most of the RAID status I'm interested in can be had from bioctl. This shows the status of each disk, including the hot spares, and the overall health of the array. I'd also like to keep an eye on the controller's battery pack health, which is where sysctl comes in. /dev/bio is pretty locked down (for good reason), so I'll want to run bioctl as root but I'd like to see the status when I log in as my regular user.
I created a file in my regular user's home directory with touch
diskstatus and added cat ~/diskstatus to my
.profile so it will run each time I log in. Then I made a cron
job for root to update this file from time to time:
@daily (date; sysctl hw.sensors.mfi0.indicator0; bioctl -h mfi0) \
	> ~user/diskstatus
Now when I log in, I get output like
Wed Apr  8 00:00:09 EDT 2020
hw.sensors.mfi0.indicator0=On (bbu ok), OK
Volume      Status               Size Device
     mfi0 0 Online               1.1T sd0     RAID10 WB
          0 Online               559G 1:0.0   noencl <TOSHIBA MBF2600RC       DA07>
          1 Online               559G 1:1.0   noencl <TOSHIBA MBF2600RC       DA07>
          2 Online               559G 1:2.0   noencl <TOSHIBA AL13SEB600      DE0D>
          3 Online               559G 1:3.0   noencl <TOSHIBA AL13SEB600      DE09>
     mfi0 1 Hot spare            559G 1:4.0   noencl <TOSHIBA AL13SEB600      DE0D>
     mfi0 2 Hot spare            559G 1:5.0   noencl <SEAGATE ST9600205SS     CS05>

I hope that you found this helpful. If this is the kind of thing you're into, you may enjoy some of my other articles. If you have any questions or comments, please feel free to drop me an e-mail.
Aaron D. Parks